Myths About Scanning Film for Maximum Quality

Update 3/31/2016

I published this article back in 2011, and at that time I had 3 years experience personally scanning negatives. Add 5 years since, and probably 500 hours scanning, and well, you get the picture.

________________________
This article dispels many myths related to the technical process of scanning negative (print) film. Developing photographers may save themselves time and money and produce higher quality scans by knowing these myths exist.
_____________________________

It bears repeating: Take lessons you read on the internet (or anywhere) with a grain of salt unless it comes with substantiating explanation.

I like reading “tips”, “lessons”, “warnings”, “advise” etc from posters on internet blogs or fora. It helps me understand what others have found to be useful so that I might use this information to solve my own problems. Believe me, growing up in the pre-internet era makes me very thankful that we now have the wealth of information available at our fingertips.

Scanning film is a necessary evil for photographers who choose to use a hybrid workflow, where film is used to capture the image and digital processes are used to produce the final image for sharing or printing.  For whatever reason, the art of communicating film scanning techniques by those who choose to  do so is like reading early software “user’s manuals”: Users couldn’t understand a word in them.  If you’re an electronics engineer, you might find that last statement funny (or not), but it’s still true. But unlike modern software developers who have learned how to communicate clearly to non-technical users, scanner developers have not.

I’ve been scanning color and monochrome negatives for about 3 years, and I think I’ve just about got it down. I can produce a digital scan of a 35mm, 6x7cm, or 4x5inch negative without unacceptable noise having very high resolution, and requiring only minimal corrections in my imaging software. My success isn’t so much due to what I’ve read in the blogs or scanning fora as much as it is about TENACITY. Which brings me to my point: Don’t take for granted that what you read in the blogs means exactly what you think it means or that it even applies to your own photographic situation.  This is doubly true if the blogger fails to substantiate (or thoroughly explain) what he/she really means, and ideally includes pros and cons with their recommendation.

Here are examples of myths I’ve read on expert sites that I accepted as truth, didn’t take the time to investigate them on my system using my workflow, and which literally set me back weeks to months in getting to the level of scanning competence that I have currently:

Myth 1. “Scanner manufacturers claim much higher resolution than they can actually deliver, so there is no need to scan above 2400 ppi.”  I use an Epson V700 scanner that Epson claims can scan at 6400 optical resolution. It also has a lower resolution lens that can scan at 4800 ppi. Experts have repeatedly scoffed at Epson’s claims, and have consistently recommended not to scan above 2400 ppi because “..you won’t get any better details from the shadows above 2400 ppi.”  What I’ve learned in my experience is that while I may not get additional shadow details when scanning at 4800 or 6400 ppi, the digital file produced is much better. I’ve found that with this scanner, when using the OEM negative holders provided to ensure optimal focal point of the higher resolution lens, I do not get what I presume is aliasing in the digital file. The effect I get when scanning at low resolution is best termed ‘blotchy’ –clear blue skies looked like wet cotton candy.  When scanning at the optical resolution of one of the lenses, clear blue skies look more like clear blue skies. For whatever reason, forcing the V700 to scan at less than the highest optical resolution for the lenses seems to produce artifacts in the scanned image.  Based solely on the quality of the resulting image, I always scan at the highest optical resolution. Yes, this requires more time scanning and more disk space, but it is the technique that produces a result that is minimally acceptable to me. I deal with the disk space requirement by buying more disk space. All of my negatives that don’t deserve printing are later compressed to “proof” resolution and archived at 5 megapixels or so.  (I always have the negatives that can be re-scanned if needed.)

Myth 2. “Scan at the minimum resolution for your intended purpose and do not compress the file.” Update:  I no longer consider this to be a myth..I’ve found it to be a good practice. But since my intended purpose is to make really large prints, I’m always scanning at maximum resolution to get the largest file size I can. 

Myth 3. “Don’t use the scanner software to set the contrast levels or balance the color; do these tasks in your image processing software instead.”  Again, until I investigated this, I abided by the expert advice and then fought the losing battle of adjusting the levels and colors in Photoshop or Lightroom without ruining the quality of the image. The result was excessive artifacts, noise, and artistic frustration painted all over the images. What these experts must presume is that every negative is perfectly exposed and taken in the best lighting God can make. As a landscape photographer, such circumstances are very rare. I typically express images that have wide latitude (meaning deep blacks and paper white highlights). If a negative has no such attributes, I will adjust the contrast to produce them.   Whoops…adjust too much and the histogram will look moth-eaten and introduce compression artifacts in the image. The more you adjust, the worse it gets.  What I’ve found works best is to get really close to the final image contrast and color balance using the scanner software. This means much less fidgeting in post-process and fewer artifacts in the final image.  Update:  I still find that the scanner algorithms for converting the continuous tones of a negative into digital bits is better than how Photograph CS5 or Lightroom 4.0 converts one tone to another.  Even my 1980s-era Howtek 4500 drum scanner does a better job than CS5 or LR at setting levels, white/black point, and perhaps even curves.

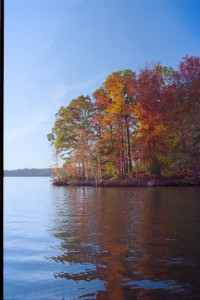
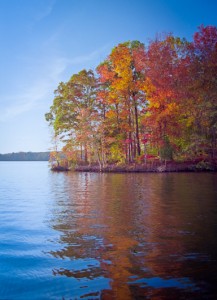
As an example, the two images below are from the same negative. The left image is straight from the scanner without any post processing; the right image received minor enhancements to adjust local and global contrast, saturation, and highlighting. No artifacts resulted from the post-processing. The negative was captured using a Nikon F5 onto Kodak Portra 400 film. I scanned the 35mm negative at 4800 ppi using VueScan with no compression. This produced a 30 megapixel image file. In Vuescan, I locked the film base color to neutral black and the image color to neutral white. Modest post-processing included cropping, adjustment to both global and local contrast, minor sharpening (but no output sharpening), and targeted adjustments to brightness and contrast to the foliage and water. The full resolution image has no processing artifacts that I can see at 100% zoom.

If you find yourself fighting your post-processing technique on flat, low contrast scanned negatives produced using the common expert recommendations, then break the rules.  Set levels and color balance in the scanner software and see for yourself if the final result is better.

Myth 4. “Scanning wet mounts will result in higher quality scans.”  Well, I tried this and found no difference in quality of the resulting scan, just a lot of additional work and cost. The scans I get using Epson V700 negative carriers, scanned at 4800 ppi, have the same detail in the shadows, the same detail in the highlights, and have the same latitude as those scanned using KAMI wet mount system. I did note that I didn’t have the dust problems when using KAMI, but otherwise I noted no improvements.  Update:  My main scanner is now a drum scanner, which requires wet mounting, so of course that’s what I do.   I think the point should be made that sometimes, you need to do what you need to do. If you have a terrible dust problem in your scanning workstation, you may find wet mounting really helps, and may be essential.  There is a far greater difference between a CMOS scanner (desktop scanner) and a PMT (drum) scanner then there is between wet mounting and dry mounting. 

Myth 5. “Amateurs use negative (print) film and professionals use transparency (slide) film.” The implication here is that transparency film somehow has qualities that so far surpass print film to make print film significantly inferior.  Such statements could lead developing photographers to adopt the use of transparency film without even exploring what I consider to be the strong points of print film. When I decided to begin shooting color about 4 years ago, I made the decision to use print film precisely for the reasons most “experts” claim as its weaknesses: exposure latitude and development latitude.

Transparency film typically has a 4-5 stop exposure latitude, about the same as most 2005-era digital cameras could detect. In landscape photography, a typical scene can deliver brightness ranges spanning 8, 9, or even 10 stops or more. This means that the photographer has to decide at the time of capture, whether to clip the shadows and lose most low light detail or to clip the highlights.  Digital photographers are well aware of this situation; most digital sensors also have latitude limitations that result in ‘blown out highlights” or “dumped shadows.” Fortunately for digital photographers, the technology is improving as new sensors are invented.

Print film has no such limitations. In fact, print film can capture the thinnest density having detail on the negative (i.e., the deepest shadows of a scene) while also capturing fine details in the most dense areas (i.e., bright whites like sun lit clouds). Easily.

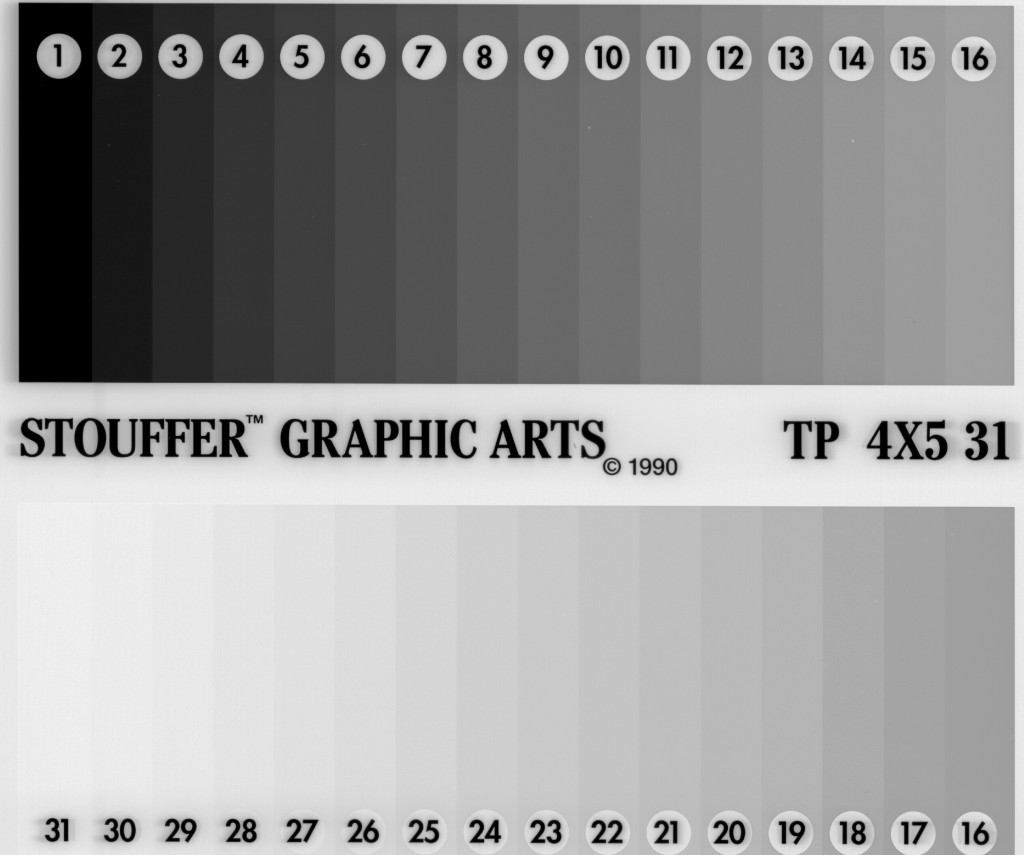
Scanners of the qualify of my Epson V700 also have a very wide latitude of detection. The figure below is a scan of a 31-step density wedge made on the Epson V700. Each step is 1/3 of a stop from its nearest neighbor, so from one end of the strip to the other is 10 stops. When I scan this step wedge as in the figure below, I can easily detect 31 distinct steps, indicating that the V700 has a detection latitude somewhat over 10 stops.

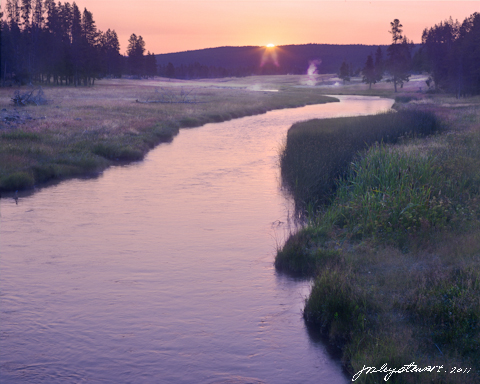
As a practical example, the scene below presented me an extreme range of brightness. This range had to be captured in one shutter click due to movement of the water, the geyser eruptions, and the sun. Then, the scanner had to detect detail in both the sun and the shadows among the foreground grasses. The picture was captured using Kodak Portra 400 film, with no neutral density gradient  filters used. I developed the film  normally. The original scan retained detail/color in the sun spot and the shadows concurrently.  If I had captured this using a digital camera or if I had used transparency film, this scene would have required multiple shots and later processed using HDR techniques and/or by compositing multiple images, which can introduce their own artifacts in the final image. Shooting with print film gave me the exposure latitude I needed to capture this scene.

I admit to never using slide film for my artistic work, so my experience is limited. However based on the knowledge that slide film has a much narrower latitude and my own experience using print film with its proven (in my hands) wide latitude, I completely dismiss expert contentions that “professionals should use transparency film while amateurs use print film”.  Don’t hesitate to use print film seriously. I’ve found that much of my landscape and nature images require the exposure latitude that only print film can deliver.

If this article helps you decide to try scanning print film or if it simplifies problems you’ve had in your scanning techniques, then it accomplishes its purpose. While the internet forums are full of information, take what you read with a grain of salt. The information is only accurate in the hands of the writer and may not relate one bit to your situation. If you have the time to test such advice, that would be a wise decision. It just may save you a lot of time and money.

Update:  To be serious photographers, we have to invest in equipment we need.  We need to learn the techniques that are important to our craft. I’ve never been one to collaborate with others in creating my photographs, and that means outside film scanners, printers, etc. If you want to use the hybrid workflow, then go ahead and invest in a scanner, learn to use it, spend the time testing various ways to get the job done using the equipment you have. At the least, the growing interest in film photography these days means a growing market for used equipment, so you can always sell the scanner later if you decide scanning is not for you!

J Riley Stewart

Film vs Digital: Insights from the High End

I’ve written already why I continue to shoot my landscapes with medium and large format film vs digital technologies. I want to share with you in this article some additional reasons why there continues to be a large group of us who do so.

I just returned from 2 weeks in the Yellowstone and Grand Tetons National Parks in the USA. These spaces epitomize the best the world has to offer in grand mountain landscapes. If you’ve never been, I hope you get to go soon.

To lay some groundwork, I traveled with two camera bags: one filled with my 35mm gear and the other with my 120 medium format gear (a Mamiya RB67 Pro S). I use the 35 mm to shoot wildlife and the medium format to photograph everything else.  What was on my tripod 99% of the time? The medium format camera. I used 22 rolls (220 frames) of either Ilford FP4 B&W or Kodak Portra color film. That’s a lot of shots, but these Parks definitely are “target rich environments” for landscape photographers!

Each of these frames of film were deliberately composed. By that I mean a series of detailed steps that ultimately result in a properly exposed capture of a scene onto the film. Very quickly, the steps include 1: envision the photograph, 2: place the tripod, 3: decide color vs B&W, 4: install the camera on the tripod, 5: quickly view through the lens, 6: change the lens if necessary, and attach the shutter release 7: adjust the tripod head to achieve the composition I wanted, 8: focus to determine the required aperture, 9: set the aperture and focus, 10: determine the correct time associated with the selected aperture (I use both incident and spot meters to do this), 11: set the time, 12: wait for the exact moment to occur if there are moving clouds or lighting changes occurring, 13: trip the shutter, .reset the shutter release, and advance the film, 14: repeat steps 1-13 as necessary to capture a different scene.

You can see it takes a bit of time to capture each and every scene using this technique, so I’m there for awhile. (I had to wait for Old Faithful for over an hour). Being in a National Park, rarely was I alone. While I was composing or waiting for the moment to arrive, I would often see out of the corner of my eye several other visitors walk up and snap a picture, then get back into their cars and zip off the the next interesting place. If they linger at all, it’s to come over to me to see what the heck I’m doing and ask about that ‘big camera.’ If they do come over, I always stop to talk to them to share ideas. After all, this is fun stuff, and I always get a kick out of what they tell me about themselves, what they’ve seen at the Park, or what they like to photograph. I even let them look through my viewfinder if they ask (and they often do).

If you are typical, you’re probably thinking, “..that’s a lot of trouble to just take a picture.” And this is just where it begins. I still need to develop and scan the film, then process the file into an image for printing. So why do I do it?

Simply put, I shoot medium format and larger film sizes because it makes a huge difference in the quality of large wall-sized prints you can make with these images.

While in Jackson, Wyoming (a popular portal to the Grand Teton National Park), I had a chance to visit 3 photographers’ galleries. Jackson is a very ‘artsy’ town, having a dozen or so art galleries within a few square blocks. All three galleries were what I’d call ‘high end’, meaning they offer and display very large photographs, up to 50 x 96 inches or thereabout.

Without exception, the artworks displayed in each gallery was absolutely beautiful. Extremely fine details even at these large sizes, beautiful coloration and composition, and beautiful finishing. Two galleries I’d highly recommend are John Richter Photography (http://www.johnrichterphoto.com) and David Brookover Gallery (http://www.brookovergallery.com/). Both artists have exceptional gallery designs and artwork in large sizes.  Both are high end artists, selling their larger creations in the thousands of dollars range.

Would it surprise you to know that neither Richter nor Brookover use digital cameras to create their masterpieces? On the contrary, John typically hauls a 4×5 Toyo film camera around, and David uses one of  two 8×10 film view cameras he owns (both were on his gallery floor when I visited, waiting for their next field trip).

I attribute the quality of their images to the fact they use larger format film cameras. This medium is capable of producing the equivalent of a 500 megapixel (for 4×5 scanned images) to 2 Gigapixel (for 8×10 scanned images) for each picture. There are many other finer attributes of film-captured images for these larger formats, but I’ll leave it at a pixel comparison for now. The most capable 35 mm digital cameras achieve 24 megapixels. You can buy digital backs for medium format and large format cameras, but you may need to sell your house first.

To put things into perspective, I know there are a great number of very successful high-end fine art photographers who use digital cameras. But when I look at their artwork (and I did, by the way, when in Jackson), I can definitely tell it. There is no comparison between their large prints and those of Richter and Brookover in terms of technical and artistic quality. That doesn’t make them ‘bad,”  just not as beautiful to my eyes.

They say that an artist should study the works of those they admire in order to develop as an artist. Well, I’ve added two artists to my admire list, Richter and Brookover. The experience of getting to see their art first hand, in their own presentations, was inspiring. I’ve also crossed off any idea of becoming a purely digital photographer in the distant future. I’ll continue to shoot some subjects digitally for specific applications, but if I’m shooting a scene that I think will look great hanging over a sofa (for instance), I’m pulling out my medium or large format cameras, and shooting film, every time!

Let me know if this has convinced you to drag out that idle film camera, or if you want to try medium or large format cameras for those special scenes you come upon. I’ll be glad to discuss the introductory steps with you.

Happy viewing!

Jim

Visiting great places near home

Wherever you live, I’ll bet dollars to donuts that at some point a visitor has asked you “..what’s there to see around here?” After you tell them about the most famous “sight” around, they invariably ask you “Have you been there?” And chances are, you have to say “no.” For some reason, Americans will go out of their way to visit places that require a long drive or short flight. We often overlook those nearby sights that are literally filled with tourists this time of year, all of whom have made long drives or short flights to get there!

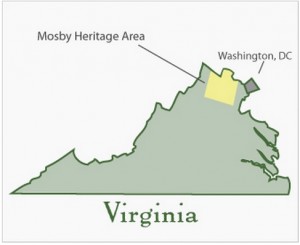
MapSince April 2011, I’ve been doing pro-bono photography for a local not-for-profit organization, the Mosby Heritage Area Association (http://www.mosbyheritagearea.org/). This Association promotes the natural and cultural heritage of the Virginia piedmont located in Loudoun County, where I live, and surrounding counties. This has been a boatload of fun, but more than that, it’s encouraged me to spend alot of time exploring parts of Virginia close to my home in Leesburg, but that I had never really explored before. 

High on a typical American photographer’s wish list is to attend workshops at  drop-dead gorgeous places like Yosemite, Yellowstone, Grand Canyon, the Tetons, Death Valley, anywhere in the Utah Mountains, Great Smoky Mountains, Appalachia, and the coasts along of the Atlantic or Pacific Oceans. Notice something?  For most of us, each of these places require a long drive or a short (sometimes not) flight! 

The northern Virginia Piedmont is largely rural and agricultural. It has constantly rolling hills, plentiful rivers and streams, hardwood and pine mixed forests, historical architecture, and lots of animals- domestic and wild. And twice a day– on most days– it has beautiful sunrises and sunsets!  I bet it’s pretty typical of areas close to your own home. Since I like taking landscape photographs, this kind of terrain is ideal as it offers variety to my camera without a lot of complexity. I’m not crazy about complex scenes.

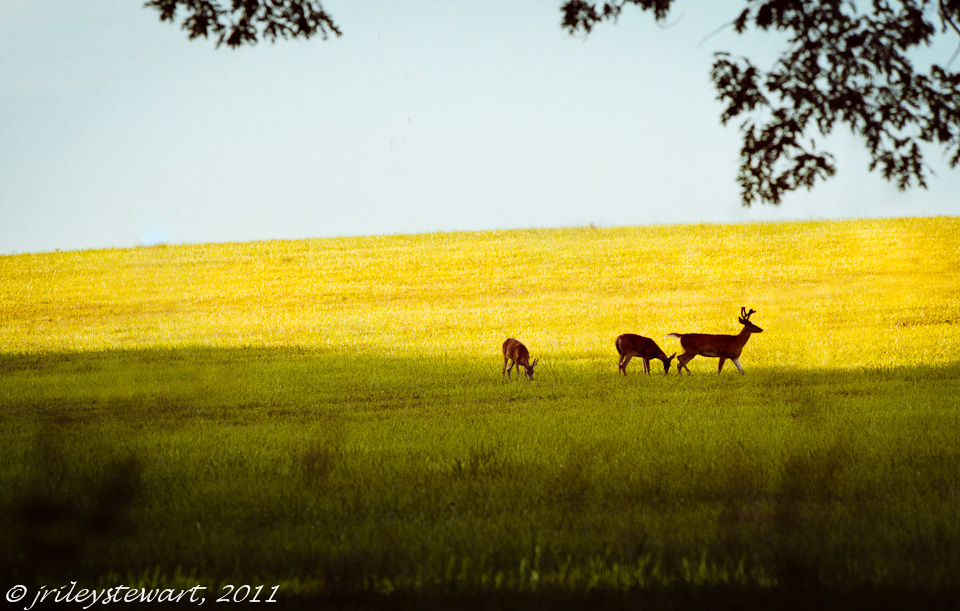
Taken during early evening in rural Fauquier County

I mentioned sunrises and sunsets before. These are my preferred times of the day to photograph landscapes (and they should be yours too). The quality of light is just awesome when the sun is up and within a couple of hours of the horizon. For example, I captured the image above of the deer grazing on Piedmont grasses about 2 hours before sunset. At these times of the day, wild animals are moving around and more visible, the deep shadows provide greater depth in the scene, and the lower intensity of light is more suited to capture by camera. Even when not shooting with a camera, driving around the countryside at or near sunrise and sunset will give you views you’ll never see at mid-day.

This is one of a pair of ornaments placed on the gate posts at the Welbourne House, an antebellum mansion belonging to the Dulaney family.

As you explore an area close to home more fully, you’ll begin to notice its enduring (and endearing) character.  On my recent trips in the Virginia Piedmont, specifically along a 7 mile stretch of US Route 50 west of Middleburg, VA, I noticed something I’d seen nowhere else in Virginia. Many of the farms in this area are large, and entrances are marked with stone gateways. What amazed me was the variety and number of ornaments placed on top of these gateways, which I found fascinating: both from a photographic perspective and from a human perspective. Clearly, some these ornaments are new, but many predate the American Civil War. I began purposefully looking for swans, foxes, eagles, pineapples, roosters, and other pieces of statuary set atop farm gate posts. At some point, I want to research how and why this small area developed this unique character, and that research will encourage me to return time and time again. I’m sure I haven’t discovered them all, yet.

So let me encourage you to get out and explore the sights close to home. Unlike more distant destinations, you can return time after time easily and really get to know the area. And don’t forget your camera!

You can view more images of my ventures into the Virginia piedmont at  Virginia Piedmont Collection


Best regards,

Jim

We can learn a lot from other artists

As a developing photographer, I found it very difficult to find advanced lessons in color theory, composition, and artistic design related to the art of photography.  EVERYBODY seems to want to talk about photography gear…cameras, lenses, software, etc., etc. Likewise, articles and books that discuss the basics of photographing are abundant. But once you’ve grasped the basics, where does a photographer turn to learn the advanced techniques so critical to becoming an accomplished fine art photographer??

I’ve mentioned before that I’m not formally trained… what I know I learned from other photographers/artists and by experimentation with my own work. Lots of experimentation.

I decided some time ago that I wasn’t going to find what I needed to know about ‘what makes a great fine art photograph‘ by reading photography magazines and photography web sites (a few exceptions aside). So now I spend more time reading blogs and newsletters that cater to fine art painters than I do to those that cater to photographers. I’ve found I can learn a lot from advanced artists, regardless of which tools they use to express their art.  

From painters: neutral whites and grays, being devoid of color (by definition), typically fail to add anything to a colorful presentation of a  landscape scene, a bowl of fruit, or even a portrait. In real life, shadows are rarely dark neutral gray or pure black and whites are rarely neutral light gray or pure white–shadows and highlights are affected by surrounding colors. Painters think about the various hues (colors) and values (‘lightness’) that their shadows and highlights must have to produce the intended emotion in their paintings before they even paint the first brush stroke.

What can we photographers learn from this? After all, this appears to conflict with the common, albeit important, basic rule of photography to white balance our photographs to reduce tinting artifacts that might appear otherwise. Unless intended for artistic reasons, a tinted photograph will more likely be accepted as distracting/disturbing instead of pleasing.

So we all white balance our photographs. And the way we do this is to find a subject in our image that “should” be without color, and remove all color from that subject, which then removes the same color globally from the image. This makes everything balanced colorwise. Whites are neutral white and grays are neutral gray, just as they should be, right?

Well…..sometimes this is right, but it may come at a cost to your creation. As fine art artists, we need to consider color confluence as Lori describes in her article. I do, and have for a long time, so let me describe how I approach this lesson with an example.

Morning light is typically warm on the landscape, and shadows are deep and cool (meaning they don’t get much of the direct warm sunlight). Under these conditions, there is no single best white balance…any setting you use will compromise the other end of the spectrum. So balancing on the cloud tops produced the resulting image below. It is generally cold, comprised largely of cyan and blue green, with just a weak hint of the warm sunlight that inspired me to capture the image in the first place.

  As photographers, we should to be aware that rarely are shadows and whites truly neutral in the environment. Neutral subjects pick up the colors of surrounding articles, even sky. We can create images of much greater impact and beauty if we exploit this lesson. Let’s not be victim to the dumb white balance algorithms in our cameras/ scanners.

The other lesson I want to return to is that fine art photography is, in fact,  art. I continue to learn more about creating art from fine art painters as I do from fine art photographers. Go where the lessons are, and your photography will reap the benefits.

If you enjoyed this article, please let me know by creating a comment and ‘liking” my FB page here:

And subscribe to my Free Articles from “Under the Darkcloth” using this link.

Best regards,

Jim

Using film in a digital world…not such a strange thing.

My mother-in-law, a wonderful person, has always enjoyed taking pictures. Her first camera was a Kodak Box Camera when she was a little girl. She’ll turn 89 this October. I’ve rarely seen her without a camera since I’ve known her these past 39 years.

Today she owns two cameras, one a digital and the other a film 35mm. She’s had the film camera for many years; the digital was a recent gift. So guess which one she uses the most: Her favorite is the film camera. She’s hardly used the digital.

Most of us take the differences between digital and film workflow (meaning the procedures necessary to generate a picture for viewing) for granted. We’ve either grown up with computers or have been using them long enough that the use of computers to capture digital images, print them, mail them, etc is no big deal. But to someone in my mother-in-law’s generation, accepting that the picture you just snapped now resides on a small “chip” in the camera that you then have to somehow get into another device that can print it….well, that can be a big hurdle. Especially when they know how easy it is to snap the picture and take film to the drug store for processing and printing. Her biggest problem today is finding a place that sells film. So I recently hooked her up with my preferred film supplier, B&H Photo in NYC (www.bhphotovideo.com). Now she can just call them when she needs refills on film.

Wait. Did he say “his preferred film supplier??” Yes, I did. You see, I shoot more film than digital, even though I have a perfectly capable digital camera (a Nikon D200) and I know digital workflow inside and out. Nor am I an octogenarian like my mother-in-law. I’m a mere quintagenarian (is that what they call “50 somethings?”).

So why am I using film in this digital age?

I get that question alot from my photography friends, usually it comes with that “what a dinosaur” look to their faces. To be honest, sometimes even I wonder why I’m hanging onto this 20 Century technology, and am tempted many times by the simplicity and ease of using a fully digital workflow. Yet, I haven’t, and likely never will, give in to these temptations. Why not? Here’s my top six reasons:

1. I get higher quality images using film. With film, I get better resolution than my 10mp digital camera when I need bigger prints. Film lets me capture a much longer scale with film- I strive to capture in my images both deep shadow details and sunlit cloud details, a look that I adore in photographs. There are technical reasons why, but digital sensors aren’t as sensitive at both shadow and highlight ends of the light scale to create the same tonal range as film.

2. I never have to worry about electronic failures that cause me to lose my images forever. Erased files, hard drive crashes, card failures–not a worry to me with film. Once I get the film developed I have it forever to rescan.

3. Film is extremely flexible since it’s a Write-Once-Read-Many format. For a single negative, I can scan it into digital form an unlimited number of times. I can scan it to 10mpixels for routine web or small print presentation, then later rescan them to 35mp (35mm negatives) or 75mp (120 medium format and 4×5 large format films) in true 16bit color. Thus, I can create huge prints (40″ x 60″ or more) this way, and those prints are high quality prints comparatively free of pixelation or other “overenlargement” artifacts that we get with 35mm digital cameras. You can buy the larger format digital cameras, but the cost compares to buying a car. No thanks.

4. Shooting film slows me down when shooting and speeds me up when processing my images. When shooting, I take more time composing each shot and shoot far fewer pictures of the same scene. By slowing down when shooting, I realize a greater appreciation for the scene; I’ve taken more time to analyze what’s before me and what inspired me to stop in the first place. I enjoy shooting more because of this. When I shoot digital, I know I have space on my memory cards for over 700 pictures. So like most digital photographers, I just snap away, taking perhaps dozens of pictures of one subject. It can be argued that this is an advantage, and in some ways it is. But–and here’s where film speeds me up– when I get home my job of culling my film shots is quicker than it is with digital. After all, I have far fewer (but better) images to deal with. I throw away alot more of my digital shots. And when I throw them away, I mean I delete them from my camera and computer, never to be seen again (see #2 above).

5. I love working with film. After thousands of times doing it, I still get a thrill seeing the negatives (both B&W and color) when I take them from the wash and hang them to dry. I get another thrill when I scan (i.e., digitize) them. And I always have the thrill when printing, which is my preferred way to present my final images. Yes, developing and scanning film is more work (actually I consider it play), and it takes experience to develop a reliable workflow for developing and scanning, and a bit of cost. But to me the thrills are worth the effort of working with film. I agree such hands-on approach is not for everyone. But, you don’t have to do it this way to use film (keep reading).

Like many professional fine art photographers, I use both film and digital cameras. While I prefer film for most of my professional work, I will use my digital camera when:
– it’s the only camera I have with me (this is ALWAYS the best camera available: the one you have with you!)
– when I don’t trust myself to make the right exposure. I sometimes need immediate feedback after I shoot the frame (we call it ‘chimping’). Sometimes it’s difficult to meter sunrise/sunset conditions or when shooting into the sun, so rather than miss the shot I will shoot it with digital, making adjustments and multiple shots until I get it just right. One day I hope to learn a better way.
– related to the point just above, I use my digital camera like photographers-of-old used polaroids, to evaluate a shot before investing the time to set up the big cameras.
– when I am shooting subjects for which I don’t expect to need large, high quality prints. These include corporate work, family shots, social events, and such.
– when I want (or need) a quick product– this doesn’t happen very often and it’s usually a matter of preference rather than need. Sometimes I just want to post a pretty picture on my Facebook page to say “look what I saw today!”

A digital camera is a great invention for many of our picture-taking situations. But it’s a mere rumor that “film is dead.” In many ways, film is superior. In a few ways, digital is superior. If quality and flexibility is important to you, film is the way to go.

I use 35mm, 6×7 medium format, and 4×5 large format film cameras in my work. You can still take rolls of 35mm to your local Costco or CVS Store and pay about $1 per roll for them to develop. They will scan it  at 2400 ppi for about $3 per roll of 36.

So try this. Chances are good that you have a 35mm film camera sitting in a drawer somewhere. Dig it out and shoot a few rolls of film. When you get the prints back (or have your developer scan them to CD for you), compare the pictures with your more recent digital camera shots. I think you’ll be amazed at how much better film captures the essence of your experience. We’re so accustomed to seeing blocked out whites in our digital pictures today that I think we’ve lost appreciation for those delicate soft wispy whites and very fine tonal changes that our eyes actually see. Film is much more capable of capturing those attributes.

Let me know if you’re happy with the result. If you are, keep the film camera handy, chances are you’ll be using it more and more.

Happy shooting.

Jim

A different view of the natural world

I only recently discovered the potential of abstract photography. I knew abstract art existed, of course, but I’d never even considered it as something I wanted to spend my artistic time on.  But about a year ago, I listened to several very successful fine art photographers talk about their approaches to abstract photography, complete with examples, and I was amazed at how beautifully nature can be depicted as abstractions.

Several months passed before I actually tried abstract photography. I was shooting at Chincoteague last Spring. While I normally attach my camera to a good tripod to ensure a sharp capture, on that day the wind was blowing so hard I could hardly stand up, let alone expect a tripod to firmly anchor my camera. So I took my camera in hand and thought I’d try this ‘abstract’ stuff. My subject was to be the salt marsh grasses violently yielding to the aforementioned wind.

I remembered one of the experts describe how moving the camera while clicking the shutter is a common technique for abstract art (there are several others). So that was what I’d try on my virgin attempt. The wind had the grasses of the salt marsh bent over about 45 degrees. I carefully practiced moving the camera parallel to the grasses, then actually took a couple frames.

Digital is great because you get immediate feedback by looking at the LCD screen on the back of the camera. After a very few tries, this is what I saw on the LCD, and I very much liked it.

Salt Marsh, Chincoteague NWR

The technique itself is straightforward and very rewarding if an abstraction is what you are after. Use a slow shutter speed so that there is distinct motion during the exposure. How slow will depend on how fast you intend to move the camera. Certainly, if your shutter speed is 1/100 sec, you need to be moving the camera pretty darn fast, and hold onto it very tightly. I recommend a much slower shutter speed- 1/2 to 1 sec even. Set that first, then meter the scene to see what aperture matches that speed. Remember that small apertures are okay, e.g. f/22 or f/32. Diffraction limitations seen at those apertures are not a concern with abstractions. Then experiment. Try different shutter speeds, different directions of movement (even circular), and various magnitudes of movement. Very small movements of the camera will give different results than large movements. By the way, this technique is even adaptable to camera phones, and Tony Sweet and others have written several articles about this.

Because of the fluid conditions used in abstract photography, the images created are exceptionally unique. In fact, I find it very difficult to reproduce a frame after I’ve captured it. I produced most of the linked abstractions below within an hour of one another and within 10 steps of each other. The landscape was a very popular and well-photographed waterfall (Elakala Falls) in West Virginia. This natural landmark has been captured photographically a million times. So after I took a few traditional pictures that I suspect will look like everyone else’s, I thought abstractly!  I’m glad I did.

Abstract art has a definition, but I’ve found that it is only loosely applied. The strict definition goes something like:  “..if you can tell what the subject is, it ain’t abstract.”   Others consider even traditional black and white images to be “abstract” because B&W doesn’t represent the real scene factually (i.e., it’s missing color). Thus, it is ‘abstract.’  I don’t know where, or if, there is a line between representational and abstract art, and frankly I don’t really care. I’m sure someone will correct me if I mis-characterize my art as “abstract” one day when it’s not. I’m prepared to wait.

What are your experiences with abstract photography? I’m definitely a novice at it, but I’m very pleased with this approach to create unique images of well-photographed places. I don’t see abstract replacing my current style, but I’m not going to limit myself and my art for the sake of being traditional, either. I see abstractions complementing my traditional fine art photography.  As long as I have fun with it and as long as the images I produce are pleasing to me and my audience, I’ll keep it in my art toolbox.

Let me hear your comments!

Jim