This article describes a simple, cheap, and effective way to convert any flat bed film scanner to implement a wet mount scanning workflow. While there are commercial wet mount assemblies you can buy, this approach is just as effective.
I’ve been shooting on film for nearly 47 years. In 2010, I mothballed my wet darkroom and began scanning my negatives instead. Using this workflow, I’ve created and sold hundreds of large-scale high fidelity prints from 35mm, 120, and 4×5 color and b&w negatives.
I believe that before you offer lessons to someone, you should establish credibility in the topic. I’ve scanned thousands of negatives over the past 10 years. I invite you to explore my portfolio of my best images by going to my online gallery.
Now the lesson on how to make your own DIY Wet Mount Negative Carrier.
Facts:
- Wet mount workflow flattens the negative without causing Newton rings.
- Wet mounting negatives fixes them in place and prevents buckling/warping during a scan.
- Wet mount workflow reduces the problem of small dust particles and may eliminate water marks on negatives, making spotting less troublesome.
- Some wet-mount practitioners report greater resolution possible with wet mount scanning: Quite frankly, I haven’t seen that benefit.
Having used a drum scanner for months, I knew the benefits of wet mounting on scanning negatives. I also use an Epson V700 for everyday scanning. I’ve devised a method for converting the standard dry-scan workflow on the V700 to a wet mount that is very easy and works very well, and should work for any transparency-based flat bed scanner.
The Alternative in a nutshell:
1. Replace the manufacturer negative carrier with a piece of good window glass, acrylic sheet, or optical glass (preferred, but not critical). This will become your new carrier.
2. Shim the new carrier so the surface where you mount your negative sits within the DOF of the scanner lens. On my Epson V700, that’s approximately 3mm or 1/8″
3. Wet-mount the negative on that surface for scanning and scan the negative as you normally do.
Materials:
- A piece of optical glass (or thick acrylic, which is just as good or better) cut to fit the platen of the V700. This will become your new negative carrier. I used plain window glass for this purpose before, but have since purchased a plate of optical glass (Epson Part #1432338 housing assy., upper–you’ll need to remove the glass from the assembly, but it’s not difficult) and found minor improvements in resolution.
- Optical mylar sheets, 8×10 or best size to fit the platen and mounting glass. *(Mine is 8×10). Get them here: http://www.aztek.com/ (also get Kami fluid, Kami tape there.)
- Thick tape, like masking tape, used for setting the height (shimming) of the new carrier.
- Optional: Thin tape that resists the fluid used to wet mount. TESA or Kami tape work well. This tape holds the mylar sheet to the carrier while wet mounting the negative(s).
- Fluid specifically for wet-mounting negatives, e.g., Kami fluid (or, some recommend lighter fluid, but I’ve never tried that). Kami fluid may seem expensive, but it goes a very long way if you are frugal with its use. (A very little goes a long way).
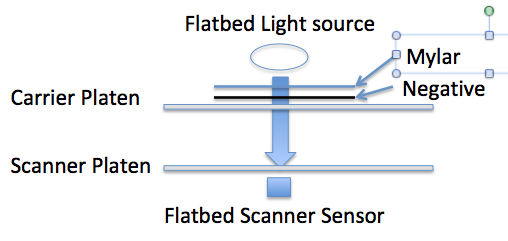
The following schematic shows what you are building (i.e., the new carrier) to mount your negatives. The distance between the Carrier Platen and the Scanner Platen is set using shims made from heavy masking tape. Regardless if you overmount or undermount, the distance between the Scanner Platen and the Negative has to be fixed and has to be within the depth of field (DOF) of the scanner lens.
Example of overmounting (relative to Carrier Platen):
Or undermounting..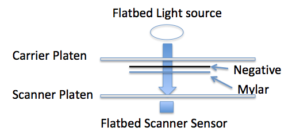
Steps:
- Clean the glass (i.e., the new carrier) with Windex or any glass cleaner.
- Tape the edges of the new DIY carrier to protect accidental damage to scanner platen during use. Apply one width of masking tape to each long side of the glass, both top and bottom. In the image below, I’ve used 1″ blue masking tape on both surfaces of the glass. Include extension tabs at all four corners to provide a way to lift the glass as you work with it (these tabs become safety handles.) Never apply tape to the “home” edge (the edge that goes to the top of the scanner platen) as this may interfere with the scanner calibration area.
- Determine the height that the upper surface (if overmounting) or lower surface (if undermounting) of the carrier must be raised above the scanner platen to achieve critical focus. See: https://jrileystewart.com/blog/2017/04/10/easily-verify-the-focus-on-your-flatbed-scanner/. Or, simply measure the height of the film plane lip on your manufacturer’s carrier, assuming that it’s optimal.
- Set the height of the carrier: First, decide if you are going to use the Overmount or Undermount method, as the thickness of the glass carrier will dictate how much height adjustment is needed.
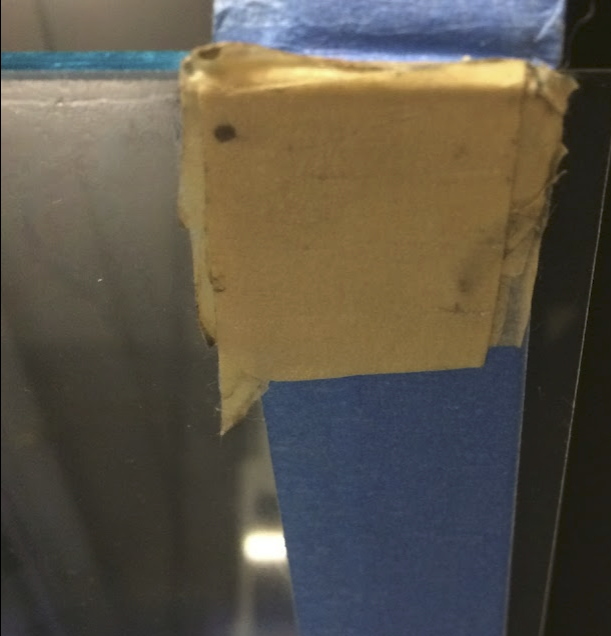
- a. If using Overmounting method: Using thick masking tape, apply as many layers as you need to the bottom of the carrier glass plate–at each corner– until the distance determined in step 3 above is reached. All four corners get exactly the same number of layers of tape. You will mount negatives to the upper surface of the glass (so called overmounting), so this has to be in critical focus of the Epson V700 or your own scanner. Shown below is one corner after several layers of yellow masking tape have been applied. Not pretty, but it works. Another way to determine how many layers of tape you’ll need is to measure as closely as possible the height of the negative shelf on your existing negative carriers, assuming they are set to critical focus already. Then keep adding layers of tape until the same height is achieved from the bottom of the tape to the top of the carrier glass.
 5.b. Alternative: If the new glass carrier doesn’t fit inside the scanner platen window, sitting directly on the platen, you’ll need to adjust the height of the new glass carrier to place the underside of the carrier at the focal point of the scanner lens, and use the Undermount design. In my hands, this required several layers of tape placed directly on the top assembly of the V700. But any way to accomplish the same thing is fine.
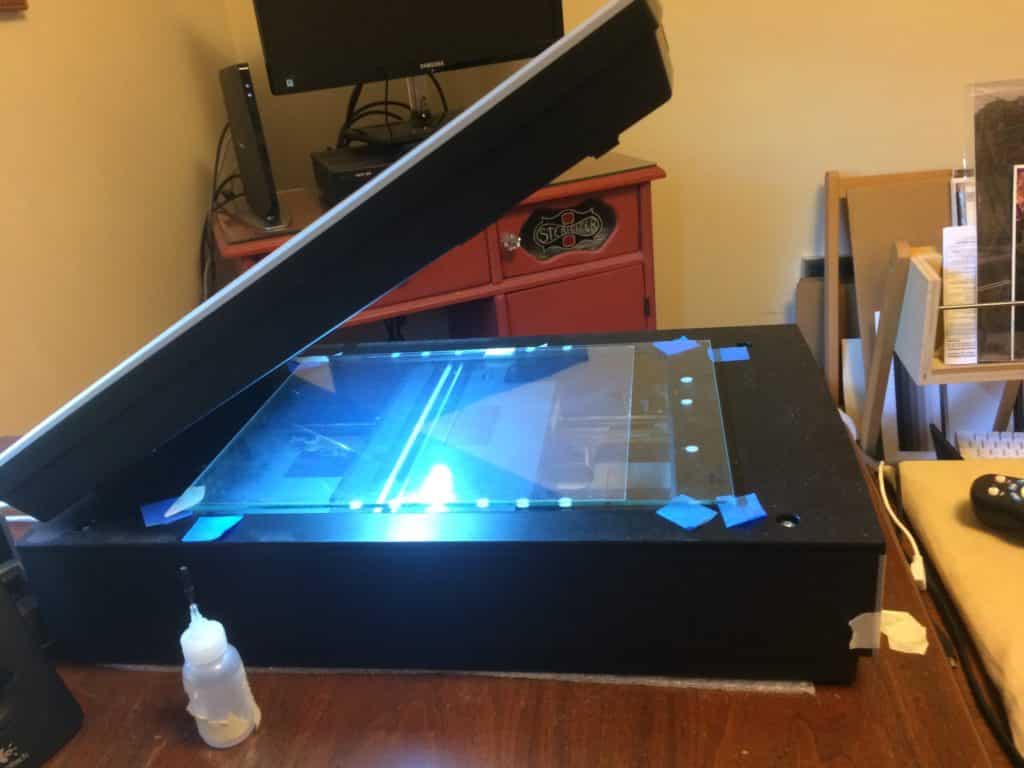
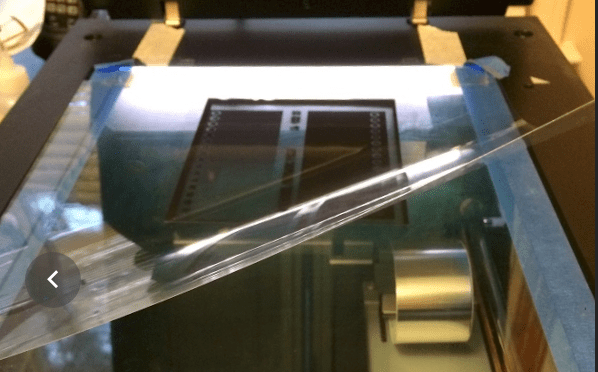
 - Wet mount a negative: Again, clean and dust the top of the carrier glass. Then, using transparent Kami tape or TESA tape, tape a piece of mylar to the new carrier at the top edge only (this is the edge of the glass that sits nearest the top edge of the scanner platen, i.e., the sensor “home.” The sheet of mylar becomes the top overlay of the complete sandwich of your wet-mount apparatus, specifically, from bottom to top: the taped corners that act as feet to raise the mounting glass off the platen to the focal plain, the piece of mounting glass, the negative, and the acrylic overlay. The next image shows me lifting the overlay mylar off the negative, which is resting on the mounting glass, which is resting on the scanner platen.
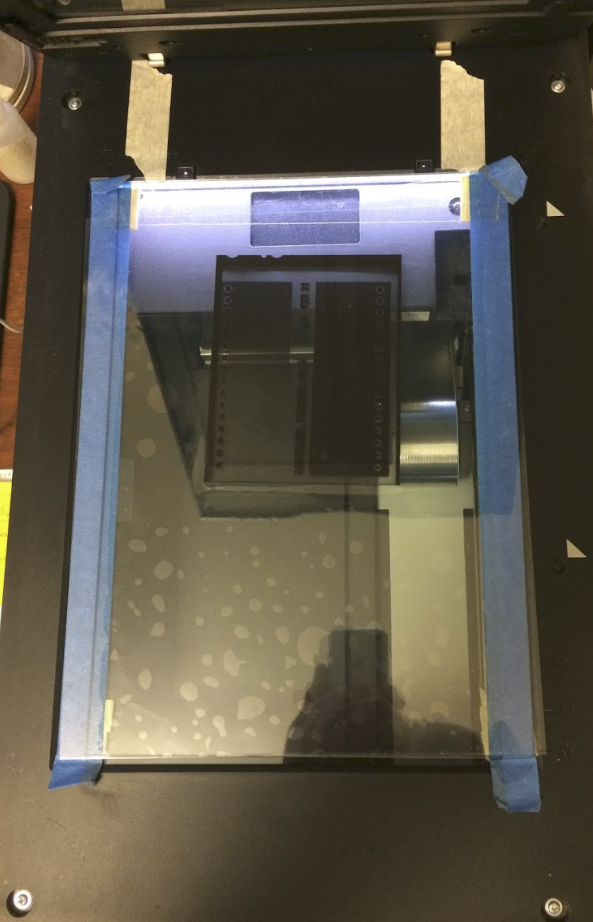
- See the complete apparatus resting on the platen in the following image (this depiction uses the Overmount design as the glass carrier fit inside the window of the V700 Upper Assembly window). The two pieces of yellow masking tape are merely guides to mark the edges of the effective scanning width of the V700 when using the higher resolution lens (which is all I use).
7. Mounting the negative. The negative is held in place by applying a thin layer of wet mounting fluid onto the mounting glass while you hold the mylar sheet up and away from the glass (I do this using one hand as I hold the overlay sheet and the negative at the same time. Then carefully lay the negative into the fluid starting with the top edge first, then slowly rolling the negative into the fluid. It needn’t be perfect. Then apply a thin layer of fluid over the negative as you roll the acrylic overlay over the negative. Finally, move any bubbles over or under the negative to the edges of the film using a non-abrasive cloth (like PEC or similar).
I hope this helps you to convert your flatbed scanner to a wet-mount workflow. I’ve been using this technique for a few years and find it very useful for 35mm, 120, and 4×5 negatives. I suspect it would also work well with 8×10 negatives, but I haven’t tried that. This would let you use the higher resolution lens of the V700 on 8×10, which may be an advantage.
Send questions / comments my way and I’ll be happy to discuss them.
J. Riley Stewart