This article is from a series I wrote for the Mosby Heritage Area Association newsletter during 2010-2012. Even though I’d lived in Loudoun County for over 10 years, I was amazed at the history that still lived in the County’s small towns and crossroads, especially Purcellville. My sources for the written history were mostly from the chronicles of local historian Eugene Scheel and the folks at the Thomas Balch Library in Leesburg. All photos by J. Riley Stewart.
 Purcellville is among several Loudoun Valley villages that grew up along the road we now know as US Route 7, but in the distant past was called the “Great Road,” the “Colonial Highway”, and “Leesburg-Snicker’s Gap Turnpike.” Purcellville has an amazing collection of historic buildings that illustrate regional architectural trends from about 1800 to 1957.
In 1764, Quakers James and Rebekah Dillon of Bucks County, Pennsylvania purchased 1,050 acres of John Mead’s original land grant. Most of what is now Purcellville is located on this land. By 1770, a network of crude east-west and north-south roads were in use on the Dillon settlement to get people and goods to Leesburg, Williams Gap on the Blue Ridge, and Hough’s Mill (now Hillsboro). This early crossroads was to become extremely important to the sustained development of Purcellville.
Purcellville began as an “ordinary” (this is what they used to call a tavern) at the crossroads along the Great Road; a place where folks could get a hot meal, plenty to drink, and share the news of the day. Within a few years of 1800, other businesses here included a general store, a blacksmith, and wheelwright shop.
It was the general store owned by Valentine Purcell, however, to which so much of the history of Purcellville is traced. While some accounts report that Purcell’s store existed as early as 1790 while others say 1822, what is clear is that this little store was the first real village center, served as the post office, an inn, and was the town hall where the vote occurred on May 23, 1861 to decide secession. The settlement itself was always called “Purcell’s Store” until the establishment of the local Post Office in 1852, when the town’s name officially became Purcellville.

Purcellville grew rapidly during the early 1800s up until the Civil War, owing much of this growth to transportation improvements. The first major improvement was the opening of the Leesburg and Snicker’s Gap Turnpike in 1835, which soon became the major east-west route through Loudoun County, including Purcell’s Store.
Purcellville’s first hotel arrived in 1838 and the first recorded stagecoach to the town stopped there in 1841. Samuel Purcell built the Hampton Hotel across the street from Purcell’s store, and it soon became a key stop along the turnpike. The hotel later became a boarding house and provided lodging for visitors to the annual Bush meetings and day-trippers heading out to Bluemont.

Purcellville escaped much of the physical tragedy of the Civil War. During the conflict, skirmishing between Union and Confederate troops took place near to but not within the present day boundaries of Purcellville. Already by 1867 daily train service had resumed to Leesburg from points east, and then one could take a stagecoach to Purcellville or continue west to Winchester or Capon Springs, West Virginia.
The next major transportation improvement was the railroad. In March 1874 the Washington & Ohio Railroad reached Purcellville. Like so many of the small villages along the Turnpike that were lucky enough to get rail service, the Leesburg Mirror described the situation as a “town . . . springing up as it were overnight.”

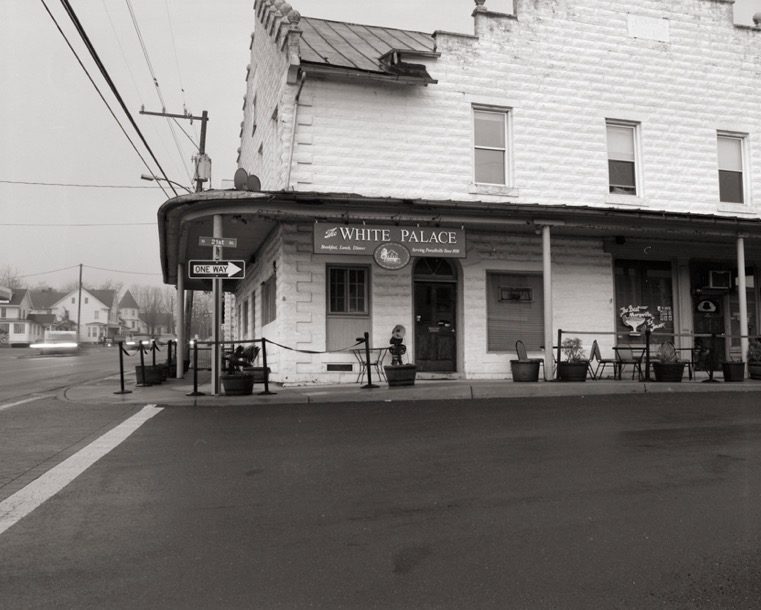
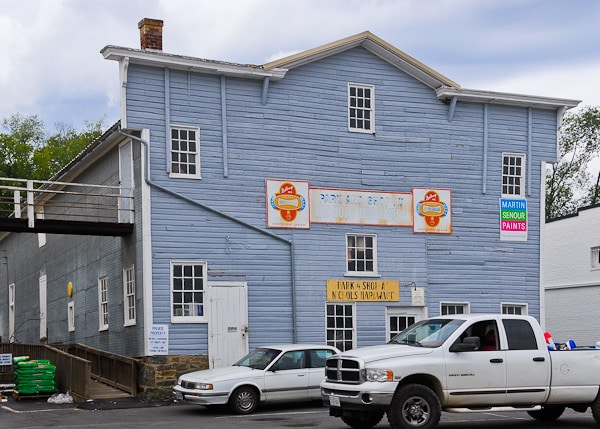
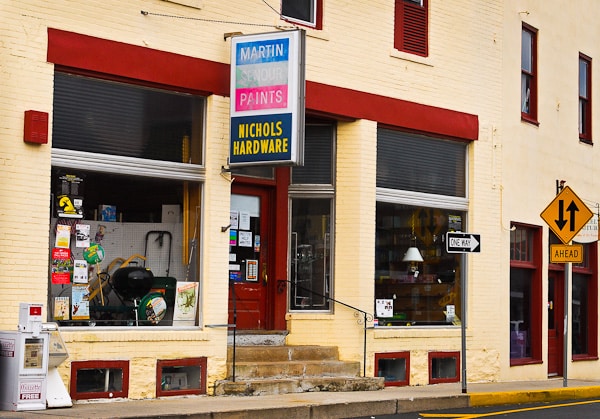
The railroad played an enormous role in the town’s growth. Industrial building began shortly after the rail arrived, and much of it remains today. A glance down Depot Road from Main Street looks like a picture taken from the 1940s. You see the ornate 1908 Hampton Hall (since 1930 housing the White Palace Restaurant), the 1904 W&OD train depot, the 1905 Smith & Hirst mill, the 1874 John J. Dillon warehouse across the street from the depot, the 1880s livery stable (now part of the Nichol’s Hardware store, and several other turn-of-the-century industrial buildings. The original 1874 Smith and Hirst mill burned in 1882, was rebuilt the next year, burned again in 1904 and was once more rebuilt in 1905. It now operates as Magnolias at the Mill restaurant, where patrons can eat amongst historic mill machinery.
Most of Purcellville’s oldest houses and smaller businesses stand along Main Street (the old turnpike) near the center of town. Examples include the original Purcell’s store (1822), the 1838 Hampton Hotel, the 1840s Asa Moore Janney house, and the 1892 ‘Free Church,’ Purcellville’s first church. Newer buildings include the 1911 St. Peter’s Episcopal Church, the 1915 Purcellville National Bank, many 1920-1930 era Craftsman-style bungalows, and the 1937 public library.

")

Last but not least, one of the oldest buildings in town isn’t in the town center, but instead sits north of town across from Southern States along Hillsboro Road (North 21stStreet). The aging white stucco house on the east side of the road was built in 1795 as the second home of James and Rebekah Dillon, the first settlers of Purcellville. Almost idyllic sitting there amongst the large trees, the old house, sadly, is boarded up and in much need of help.

The important collection of both pre- and post-Civil War architecture in Purcellville rivals any other town in northern Virginia. It is listed on the National Register of Historic Places and the Virginia Landmarks Registry.
I live near Purcellville and have been there more than a hundred times. Still, I had no idea of the wealth of late 19th Century artifacts there. One reason is the volume of traffic in the town: one gets so busy just driving that it’s easy to miss the treasures. My recommendation is to slow down, walk around the historic district, take in the nice restaurants and shops, and enjoy the ambience for what it’s worth.
_______________
I’m traveling around Virginia visiting its many small towns during quiet times; before the hustle bustle begins, to feel what they might have been like 75, 100 years ago. Follow my progress with Small Town Virginia.
J. Riley Stewart, Leesburg, VA